![]()
![]()
(注:严格保留所有 Markdown 格式和链接内容,仅对按钮描述文字进行本地化翻译)
In [3]:
Copied!
%%capture --no-stderr
%pip install --quiet -U langgraph_sdk langchain_core
%%capture --no-stderr
%pip install --quiet -U langgraph_sdk langchain_core
核心概念
需要理解以下几个核心概念:
LangGraph —
- Python 和 JavaScript 库
- 支持创建智能体工作流
LangGraph API —
- 封装图代码
- 提供任务队列管理异步操作
- 支持跨交互状态持久化
LangGraph Cloud —
- LangGraph API 的托管服务
- 支持从 GitHub 仓库部署图
- 提供已部署图的监控和追踪功能
- 每个部署都有专属访问 URL
LangGraph Studio —
- LangGraph 应用的集成开发环境(IDE)
- 以 API 为后端,支持图的实时测试与探索
- 可在本地运行或云端部署
LangGraph SDK —
- 用于编程交互的 Python 库
- 为本地或云端运行的图提供统一接口
- 支持创建客户端、访问助手、线程管理和运行执行
本地测试
⚠️ 免责声明
自视频录制后,我们已更新 Studio 使其可在本地运行并通过浏览器访问。现在这是运行 Studio 的首选方式(而非视频中展示的桌面应用)。关于本地开发服务器的文档参见此处,本地运行 Studio 的说明参见此处。要启动本地开发服务器,请在本模块的 /studio 目录下执行以下命令:
langgraph dev
你将看到如下输出:
- 🚀 API: http://127.0.0.1:2024
- 🎨 Studio 界面: https://smith.langchain.com/studio/?baseUrl=http://127.0.0.1:2024
- 📚 API 文档: http://127.0.0.1:2024/docs
在浏览器中访问 Studio 界面:https://smith.langchain.com/studio/?baseUrl=http://127.0.0.1:2024。
In [1]:
Copied!
if 'google.colab' in str(get_ipython()):
    raise Exception("Unfortunately LangGraph Studio is currently not supported on Google Colab")
if 'google.colab' in str(get_ipython()):
raise Exception("Unfortunately LangGraph Studio is currently not supported on Google Colab")
In [2]:
Copied!
from langgraph_sdk import get_client
from langgraph_sdk import get_client
In [3]:
Copied!
# This is the URL of the local development server
URL = "http://127.0.0.1:2024"
client = get_client(url=URL)

# Search all hosted graphs
assistants = await client.assistants.search()
# This is the URL of the local development server
URL = "http://127.0.0.1:2024"
client = get_client(url=URL)
# Search all hosted graphs
assistants = await client.assistants.search()
In [4]:
Copied!
assistants[-3]
assistants[-3]
Out[4]:
{'assistant_id': 'fe096781-5601-53d2-b2f6-0d3403f7e9ca',
 'graph_id': 'agent',
 'config': {},
 'metadata': {'created_by': 'system'},
 'name': 'agent',
 'created_at': '2025-03-04T22:57:28.424565+00:00',
 'updated_at': '2025-03-04T22:57:28.424565+00:00',
 'version': 1}
In [3]:
Copied!
# We create a thread for tracking the state of our run
thread = await client.threads.create()
# We create a thread for tracking the state of our run
thread = await client.threads.create()
现在,我们可以通过 client.runs.stream 运行我们的智能体,需要提供以下参数:
thread_id(线程ID)graph_id(图ID)input(输入内容)stream_mode(流模式)
我们将在后续模块中深入探讨流式处理机制。
目前只需了解:通过设置 stream_mode="values",我们正在流式传输图执行过程中每一步的完整状态值。
状态数据存储在 chunk.data 中。
In [4]:
Copied!
from langchain_core.messages import HumanMessage

# Input
input = {"messages": [HumanMessage(content="Multiply 3 by 2.")]}

# Stream
async for chunk in client.runs.stream(
        thread['thread_id'],
        "agent",
        input=input,
        stream_mode="values",
    ):
    if chunk.data and chunk.event != "metadata":
        print(chunk.data['messages'][-1])
from langchain_core.messages import HumanMessage
# Input
input = {"messages": [HumanMessage(content="Multiply 3 by 2.")]}
# Stream
async for chunk in client.runs.stream(
thread['thread_id'],
"agent",
input=input,
stream_mode="values",
):
if chunk.data and chunk.event != "metadata":
print(chunk.data['messages'][-1])
{'content': 'Multiply 3 by 2.', 'additional_kwargs': {'example': False, 'additional_kwargs': {}, 'response_metadata': {}}, 'response_metadata': {}, 'type': 'human', 'name': None, 'id': 'cdbd7bd8-c476-4ad4-8ab7-4ad9e3654267', 'example': False}
{'content': '', 'additional_kwargs': {'tool_calls': [{'index': 0, 'id': 'call_iIPryzZZxRtXozwwhVtFObNO', 'function': {'arguments': '{"a":3,"b":2}', 'name': 'multiply'}, 'type': 'function'}]}, 'response_metadata': {'finish_reason': 'tool_calls', 'model_name': 'gpt-4o-2024-05-13', 'system_fingerprint': 'fp_157b3831f5'}, 'type': 'ai', 'name': None, 'id': 'run-06c7243c-426d-4c81-a113-f1335dda5fb2', 'example': False, 'tool_calls': [{'name': 'multiply', 'args': {'a': 3, 'b': 2}, 'id': 'call_iIPryzZZxRtXozwwhVtFObNO', 'type': 'tool_call'}], 'invalid_tool_calls': [], 'usage_metadata': None}
{'content': '6', 'additional_kwargs': {}, 'response_metadata': {}, 'type': 'tool', 'name': 'multiply', 'id': '988cb170-f6e6-43c1-82fd-309f519abe6d', 'tool_call_id': 'call_iIPryzZZxRtXozwwhVtFObNO', 'artifact': None, 'status': 'success'}
{'content': 'The result of multiplying 3 by 2 is 6.', 'additional_kwargs': {}, 'response_metadata': {'finish_reason': 'stop', 'model_name': 'gpt-4o-2024-05-13', 'system_fingerprint': 'fp_157b3831f5'}, 'type': 'ai', 'name': None, 'id': 'run-7bda0aa0-6895-4250-9625-18419c5dc171', 'example': False, 'tool_calls': [], 'invalid_tool_calls': [], 'usage_metadata': None}
云端测试
我们可以通过 LangSmith 部署到云端,具体操作步骤详见此处。
在 GitHub 创建新仓库
- 登录您的 GitHub 账户
- 点击右上角"+"图标,选择
"New repository" - 为仓库命名(例如
langchain-academy)
添加 GitHub 仓库为远程源
- 返回本课程开始时克隆
langchain-academy的终端窗口 - 将新建的 GitHub 仓库添加为远程源
git remote add origin https://github.com/your-username/your-repo-name.git
- 推送代码
git push -u origin main
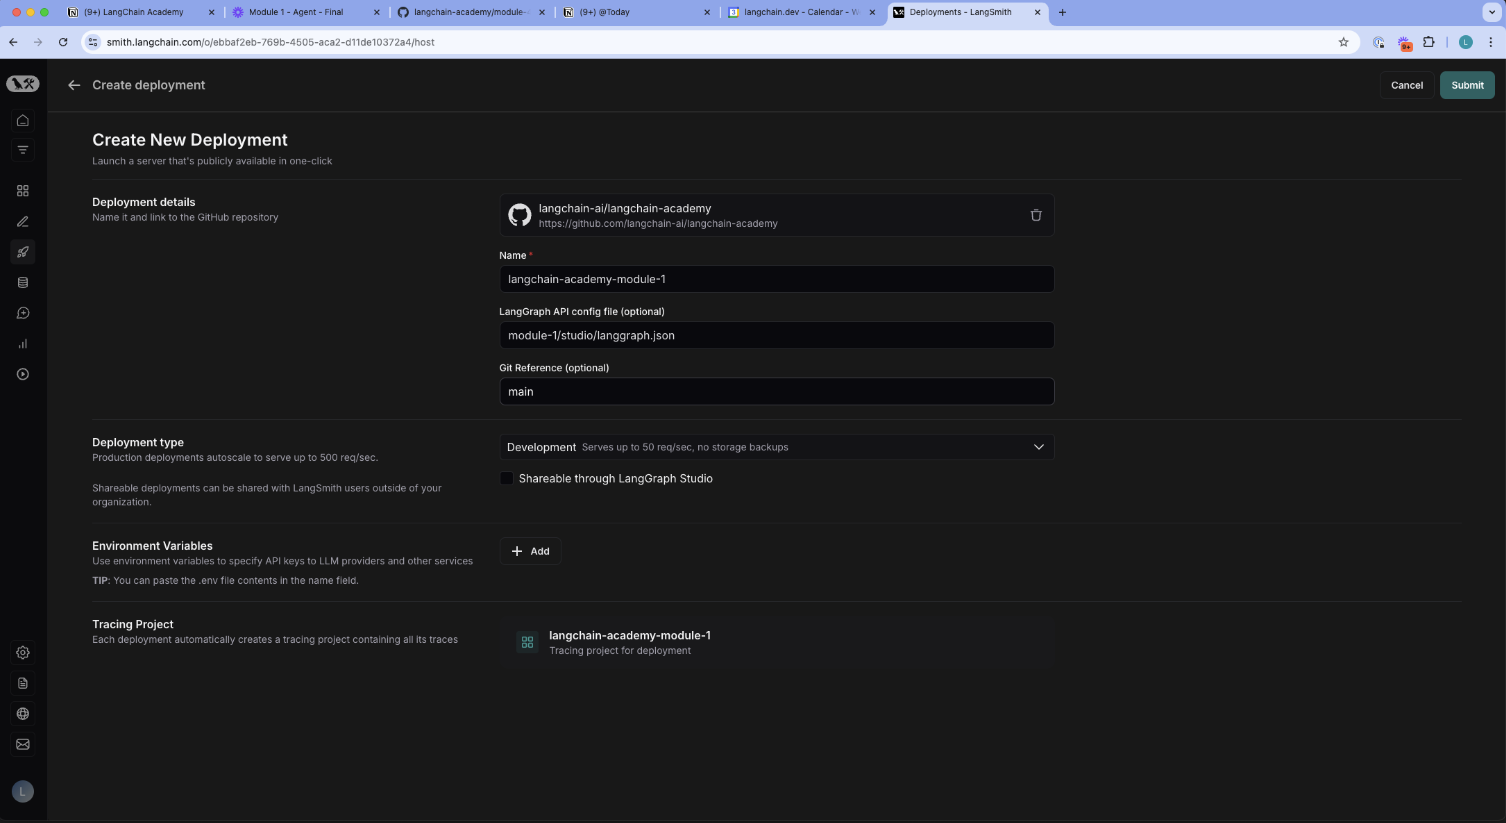
将 LangSmith 连接到 GitHub 仓库
- 访问 LangSmith
- 点击左侧面板的
deployments选项卡 - 添加
+ New Deployment - 选择您为本课程创建的 GitHub 仓库(如
langchain-academy) - 将
LangGraph API 配置文件指向某个studio目录 - 例如对于模块1,使用:
module-1/studio/langgraph.json - 设置 API 密钥(可直接从
module-1/studio/.env文件复制)
使用您的部署
我们可以通过多种方式与部署进行交互:
- 使用之前提到的 SDK
- 通过 LangGraph Studio
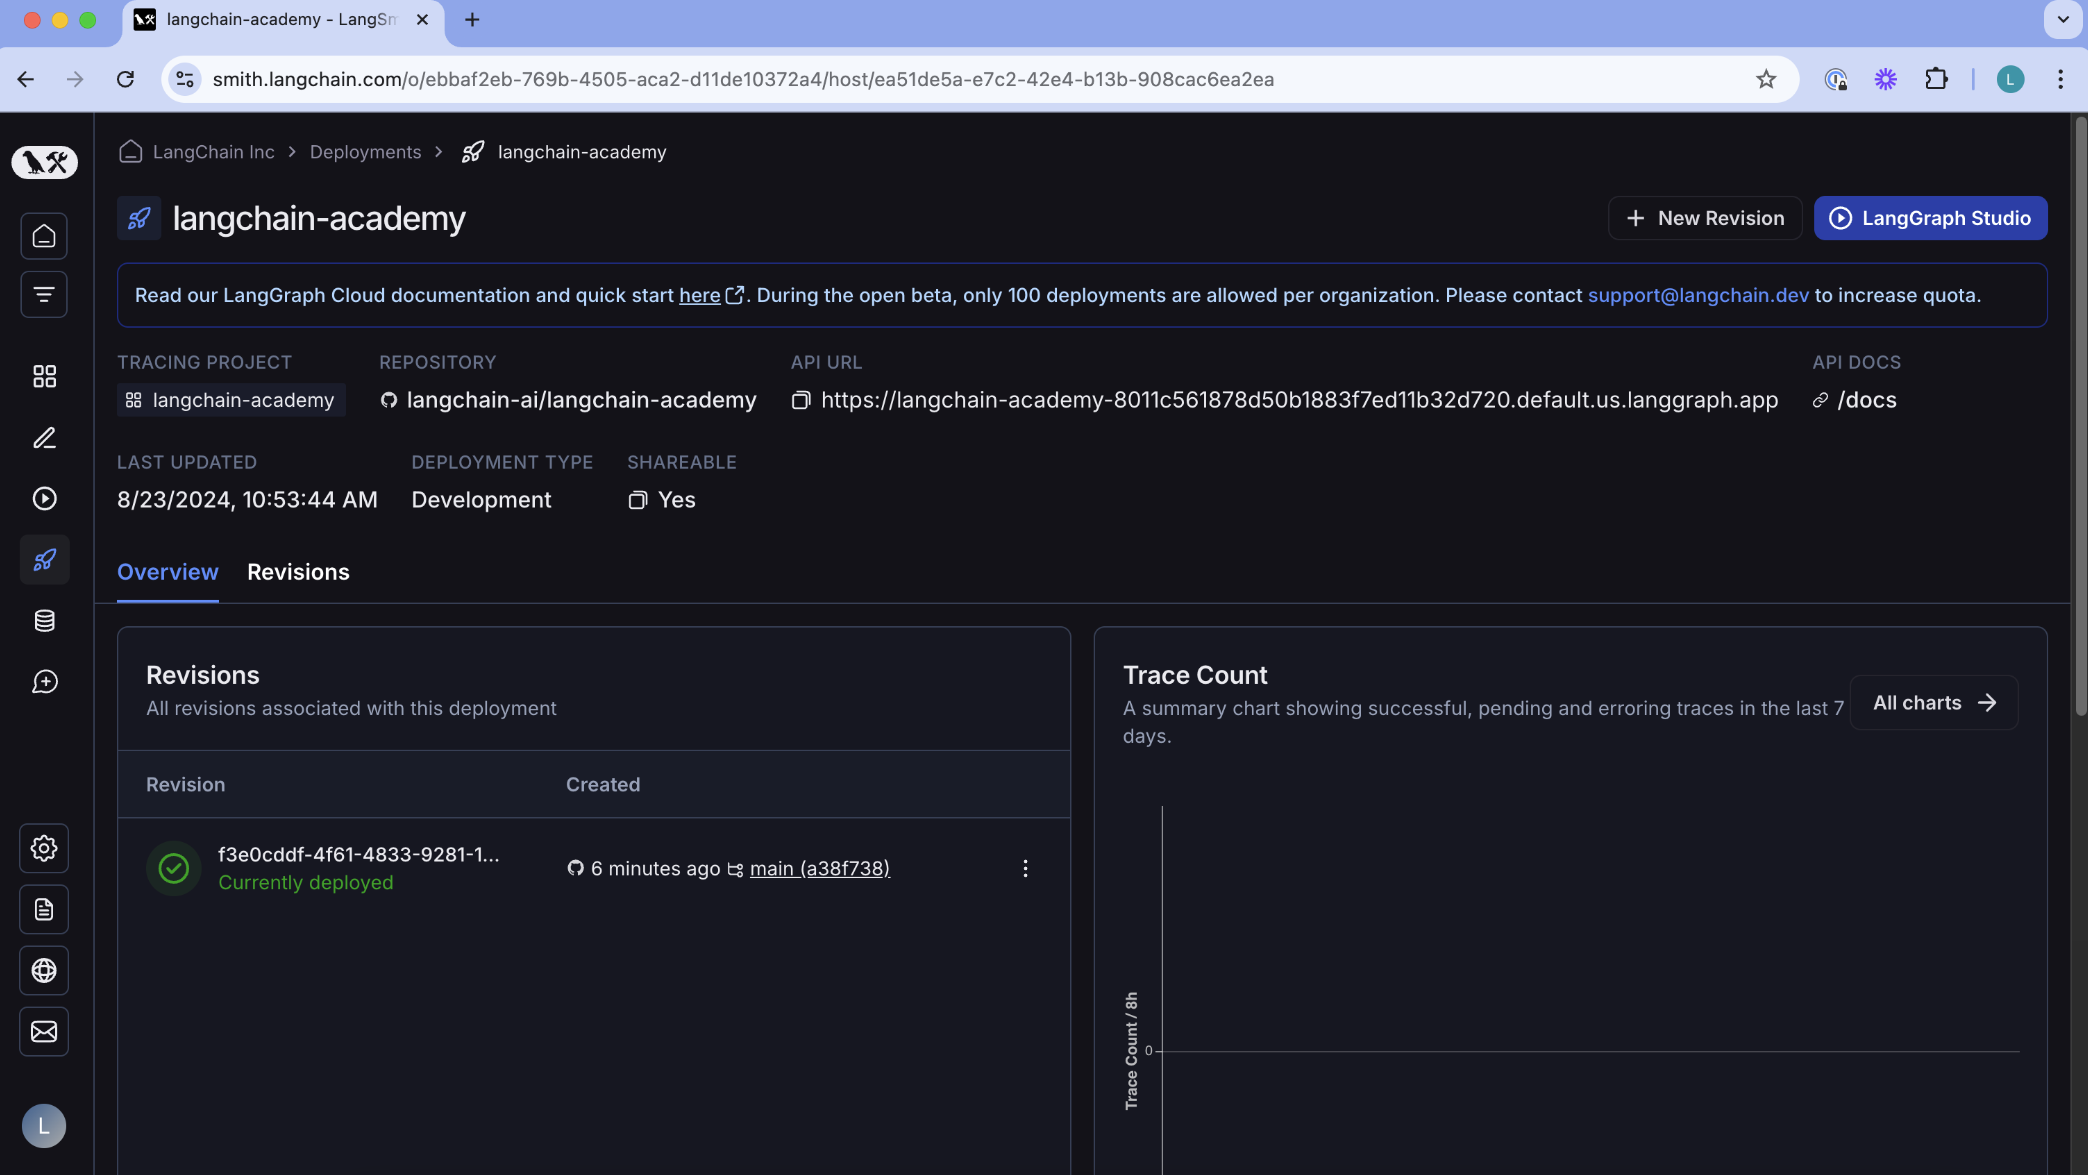
若要在笔记本中使用 SDK,只需确保已设置 LANGSMITH_API_KEY!
In [1]:
Copied!
import os, getpass

def _set_env(var: str):
    if not os.environ.get(var):
        os.environ[var] = getpass.getpass(f"{var}: ")

_set_env("LANGSMITH_API_KEY")
import os, getpass
def _set_env(var: str):
if not os.environ.get(var):
os.environ[var] = getpass.getpass(f"{var}: ")
_set_env("LANGSMITH_API_KEY")
In [ ]:
Copied!
# Replace this with the URL of your deployed graph
URL = "https://langchain-academy-8011c561878d50b1883f7ed11b32d720.default.us.langgraph.app"
client = get_client(url=URL)

# Search all hosted graphs
assistants = await client.assistants.search()
# Replace this with the URL of your deployed graph
URL = "https://langchain-academy-8011c561878d50b1883f7ed11b32d720.default.us.langgraph.app"
client = get_client(url=URL)
# Search all hosted graphs
assistants = await client.assistants.search()
In [37]:
Copied!
# Select the agent
agent = assistants[0]
# Select the agent
agent = assistants[0]
In [38]:
Copied!
agent
agent
Out[38]:
{'assistant_id': 'fe096781-5601-53d2-b2f6-0d3403f7e9ca',
 'graph_id': 'agent',
 'created_at': '2024-08-23T17:58:02.722920+00:00',
 'updated_at': '2024-08-23T17:58:02.722920+00:00',
 'config': {},
 'metadata': {'created_by': 'system'}}
In [40]:
Copied!
from langchain_core.messages import HumanMessage

# We create a thread for tracking the state of our run
thread = await client.threads.create()

# Input
input = {"messages": [HumanMessage(content="Multiply 3 by 2.")]}

# Stream
async for chunk in client.runs.stream(
        thread['thread_id'],
        "agent",
        input=input,
        stream_mode="values",
    ):
    if chunk.data and chunk.event != "metadata":
        print(chunk.data['messages'][-1])
from langchain_core.messages import HumanMessage
# We create a thread for tracking the state of our run
thread = await client.threads.create()
# Input
input = {"messages": [HumanMessage(content="Multiply 3 by 2.")]}
# Stream
async for chunk in client.runs.stream(
thread['thread_id'],
"agent",
input=input,
stream_mode="values",
):
if chunk.data and chunk.event != "metadata":
print(chunk.data['messages'][-1])
{'content': 'Multiply 3 by 2.', 'additional_kwargs': {'example': False, 'additional_kwargs': {}, 'response_metadata': {}}, 'response_metadata': {}, 'type': 'human', 'name': None, 'id': '8ea04559-f7d4-4c82-89d9-c60fb0502f21', 'example': False}
{'content': '', 'additional_kwargs': {'tool_calls': [{'index': 0, 'id': 'call_EQoolxFaaSVU8HrTnCmffLk7', 'function': {'arguments': '{"a":3,"b":2}', 'name': 'multiply'}, 'type': 'function'}]}, 'response_metadata': {'finish_reason': 'tool_calls', 'model_name': 'gpt-4o-2024-05-13', 'system_fingerprint': 'fp_3aa7262c27'}, 'type': 'ai', 'name': None, 'id': 'run-b0ea5ddd-e9ba-4242-bb8c-80eb52466c76', 'example': False, 'tool_calls': [{'name': 'multiply', 'args': {'a': 3, 'b': 2}, 'id': 'call_EQoolxFaaSVU8HrTnCmffLk7', 'type': 'tool_call'}], 'invalid_tool_calls': [], 'usage_metadata': None}
{'content': '6', 'additional_kwargs': {}, 'response_metadata': {}, 'type': 'tool', 'name': 'multiply', 'id': '1bf558e7-79ef-4f21-bb66-acafbd04677a', 'tool_call_id': 'call_EQoolxFaaSVU8HrTnCmffLk7', 'artifact': None, 'status': 'success'}
{'content': '3 multiplied by 2 equals 6.', 'additional_kwargs': {}, 'response_metadata': {'finish_reason': 'stop', 'model_name': 'gpt-4o-2024-05-13', 'system_fingerprint': 'fp_3aa7262c27'}, 'type': 'ai', 'name': None, 'id': 'run-ecc4b6ad-af15-4a85-a76c-de2ed0ed8ed9', 'example': False, 'tool_calls': [], 'invalid_tool_calls': [], 'usage_metadata': None}
In [ ]:
Copied!